Internet Performance 2021-07-19
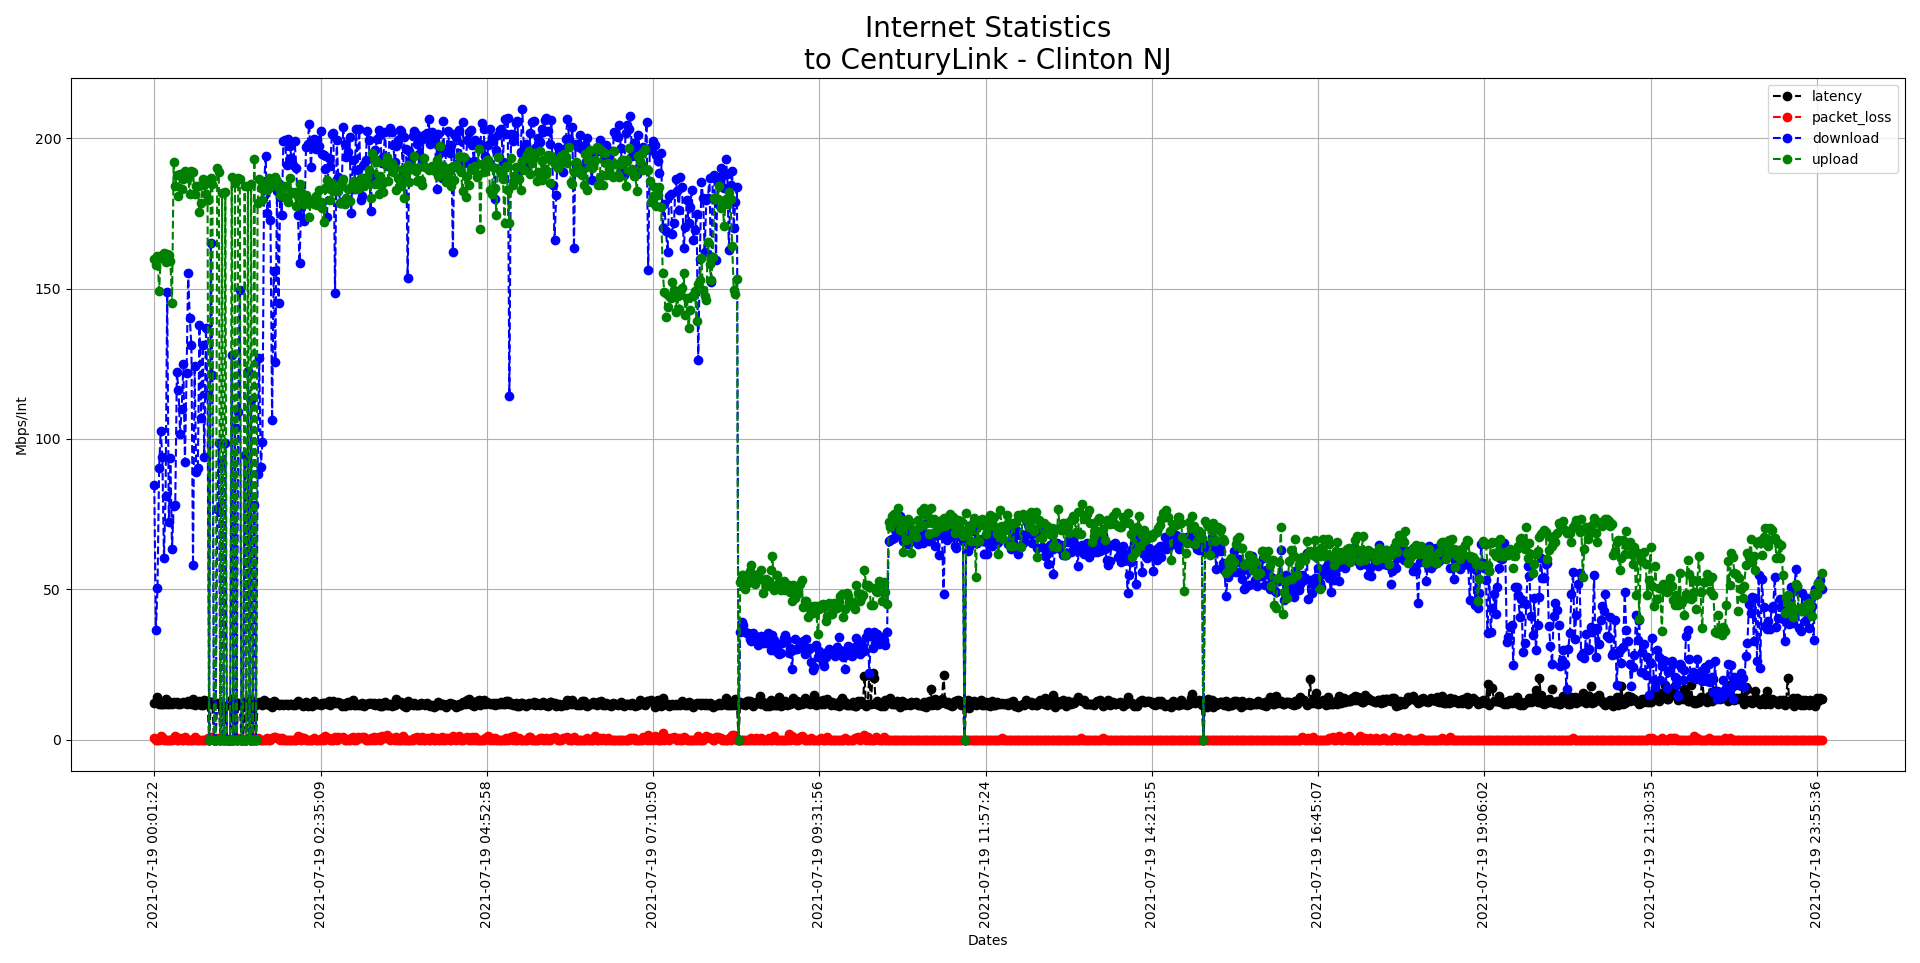
I had to remove jitter because it was so high (just a few times) that it skewed the y axis.
Fighting with your Internet Provider
My apartment complex recently contracted a bulk internet service to provide what they would say was better and cheaper internet service. After several weeks of slow and intermittent connections I decide to document how the service was performing and post the data for my fellow tenants to view. This first post will quickly outline how I scripted a internet connection monitor using Python.
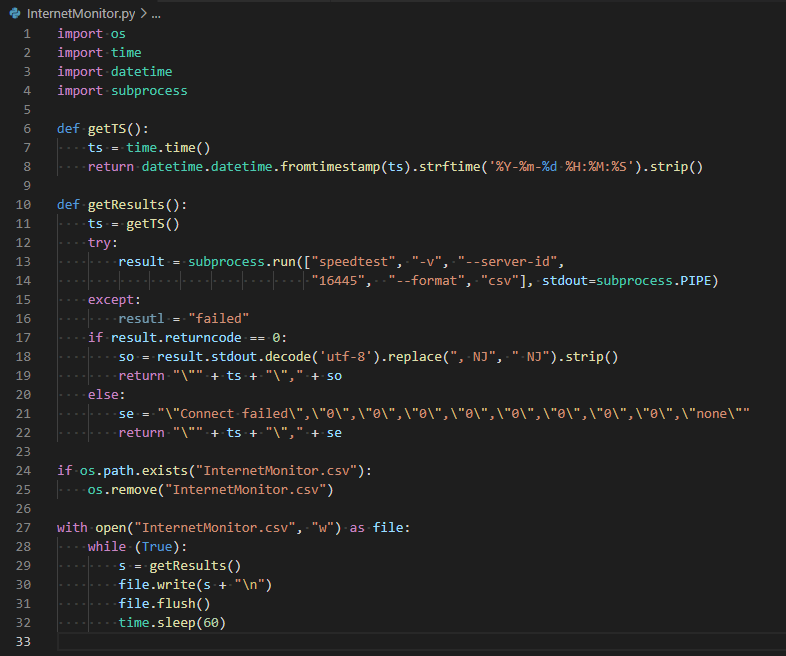
- Download the SpeedTest Command Line Interface from here
- Use this python script to collect the data on a periodic basis and place it in a log file
Here are my results for July 18th 2021
- Data is for only part of the day, I started monitoring around 2pm
- There is a gap in the data from 3:30pm to 6:15pm since the connection was severed and I did not have automatic reconnection selected on my laptop
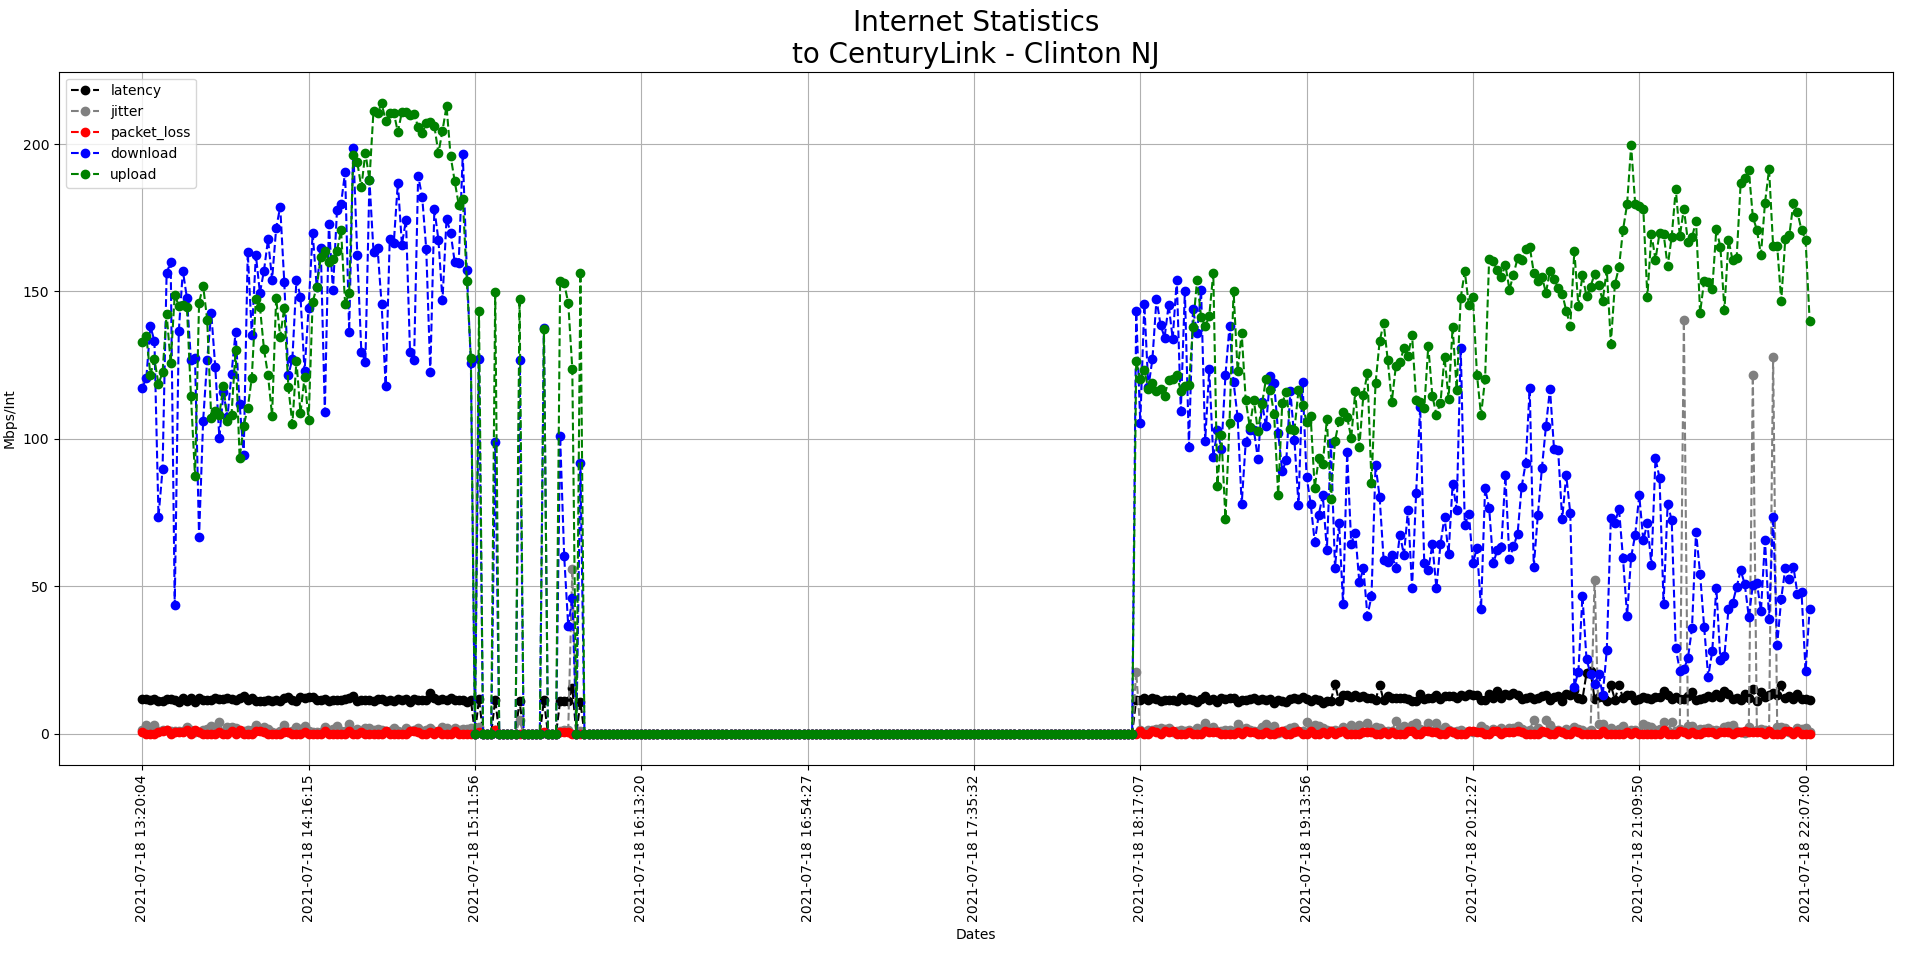
Notice that
- Something strange happened at around 3:15pm when the network started to become unstable
- Download performance drops through the night but upload performance is not that bad.
- The Century Link – Clinton server is used as a machine-on-the-internet so that the speed test can test the connection from my device to one actually on the internet.
Finally, here are some definitions to help you understand what you are looking at
Latency
Latency is a measure of delay. In a network, latency measures the time it takes for some data to get to its destination across the network. It is usually measured as a round trip delay – the time taken for information to get to its destination and back again.
Jitter
JItter is used to describe the amount of inconsistency in latency across the network, while latency measures the time it takes for data to reach its destination and ultimately make a round trip.
packet loss
When accessing the internet or any network, small units of data called packets are sent and received. When one or more of these packets fails to reach its intended destination, this is called packet loss. For users, packet loss manifests itself in the form of network disruption, slow service and even total loss of network connectivity. Note that packet loss does not mean the data is total lost, usually the systems will retransmit the data (adding to network traffic etc.)
Download
Measured in Mega bits per second (Mbps) this is essentially how fast your data is coming down from the internet to your device.
Upload
Measured in Mega bits per second (Mbps) this is essentially how fast your data is leaving your device as it goes to the internet.
Comprehending Dictionary Comprehensions
I’ve been using list comprehensions in Python for a while now and recently needed to perform the same sort of thing using dictionaries. After a little searching I found this.
https://www.python.org/dev/peps/pep-0274
“However, Python 2.7 and 3.0 introduces this exact feature, as well as the closely related set comprehensions. On 2012-04-09, the PEP was changed to reflect this reality by updating its Status to Accepted, and updating the Python-Version field. The Open Questions section was also removed since these have been long resolved by the current implementation.”
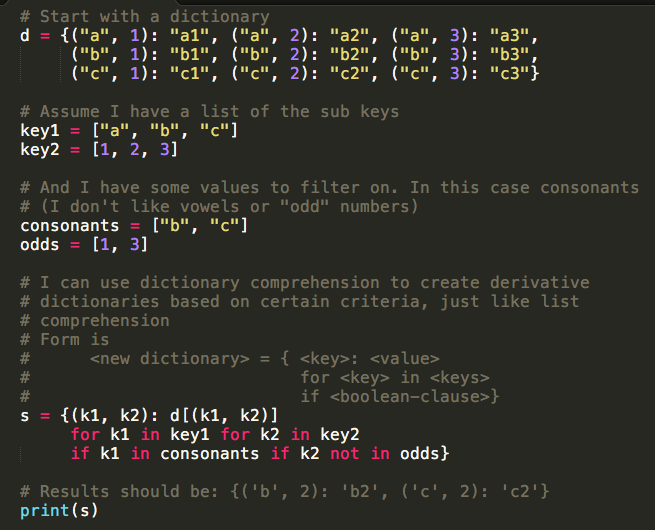
Apparently you can do dictionary comprehensions, and here is a simple example:
Using Git with SSL certificates
If you want to use SSL certificates with Git you basically have two options
- Use a global SSL certificate or
- Use a project level or local SSL certificate.
Trade Offs and Pitfalls
Using a global SSL certificate means that you can really only talk to one Git server at a time. Each time you want to switch to another server you will have to uninstall the global SSL certificate and install the SSL certificate for the new server. If you live in a world of only one Git server your lucky and this is the solution for you. If not, you will need to use project level SSL certificates.
Using project level SSL certificates has its pitfalls as well. First, project level SSL certificates make the creation or cloning of repositories more difficult since there are more steps. Second, usually the project SSL certificate is stored in the project directory where it may get deleted. (You might want to experiment with placing the SSL certificate in the .git directory if you don’t want to see it.)
Here are some scripts that illustrate how to make use of global and project level SSL certificates. These scripts assume that the certificate has been placed on the host in a directory pointed to by the environment variable SSLCERT_PATH.
Administrator’s note
To make this work, you will need to copy the certificate to a well-known and accessible location. For example:
cp /etc/gitcert/tfscert.crt
chmod 755 /etc/gitcert/
chmod 744 /etc/gitcert/tfsprd.crt
Finally, set the environment variable SSLCERT_PATH to /etc/gitcert/tfsprd.crt by adding this to the user’s default shell profile:
export SSLCERT_PATH=/etc/gitcert/tfsprd.crt
Examples
These scripts illustrate how to add and delete global SSL certificates:
[InstallGlobalCert.sh]
#!/bin/bash
git config –global http.sslverify true
git config –global http.sslcainfo $(SSLCERT_PATH)
git config –global –l
[UninstallGlobalCert.sh]
#!/bin/bash
git config –global http.sslverify false
git config –global –unset http.sslcainfo
git config –global -l
Using project level SSL certificates is a chicken & egg problem. We can’t clone a repository without an SSL certificate but we can’t add an SSL certificate until we have created the repository. The answer to this dilemma to create and empty local repository and then attach the remote repository to it once the SSL certificate has been added. For example if we are cloning a repository, we would need to follow these steps in order:
- Make a new empty repository,
- Add the required SSL certificate to it, and
- Attach and load the local repo with the remote repository contents.
This script will allow a user to clone an existing repository using a project level SSL certificate:
[CloneProject.sh]
#!/bin/bash
# Usage:
#
# cmd url directory
#
# Where;
#
# url – is the git URL to the project to clone
# directory – is the directory to clone into
#
( mkdir $2 ; cd $2 ; git init )
( mkdir $2/gitcert ; cp ${SSLCERT_PATH} $2/gitcert )
( cd $2 ; git config http.sslverify true ;
( cd $2 ; git config http.sslcainfo ./gitcert/tfsprd.crt ; git config -l )
( cd $2 ; git remote add origin $1 ; git fetch )
( cd $2 ; git branch master origin/master ; git checkout master )
I hope these examples help you leverage the power of Git over SSL. If you have any questions please feel free to add them to the comments.
Git Credential Caching
If you hate entering your credentials every 5 minutes when using git then you might like this command…
Put the command below in your ~/.bashrc file and git will cache your credentials for 7200 seconds (2 hours). This way you only need to enter userid/passwords once every two hours. This is per-session and credentials are chached in memory so they never get stored on disk.
git config –global credential.helper ‘cache –timeout 7200’
You can experiment with larger timeouts, I don’t know if there is a maximum.
Augmenting Anaconda
If you have ever wanted to add new packages you an existing Anaconda installation. The following steps will allow you to install additional packages within the Anaconda python environment. Since all installation steps write to user local areas no administrator privileges are necessary.
- Tell Anaconda that you want to build python packages as directories (not egg files). This is done by adding the following to the file “C:\Anaconda\Lib\distutils\distutils.cfg”:
[easy_install]
zip_ok = false
This is a onetime action. When building your next package you won’t need to do this again.
- If C/C++ compilation is required, download and install the python 2.7 compilation redistributable package provided my Microsoft. See the link http://www.microsoft.com/en-us/download/details.aspx?id=44266.
This is also a onetime action.
- Download the source of the python package you want to install. Assume we have downloaded and unzipped the file:
pyodbc-4.0.3.tar.gz
resulting in the directory
C:\Users\caknigh\Dowloads\pyodbc-4.0.3
- Assume that you want to install all non-Anaconda packages in a personal directory. For example:
c:\Users\caknigh\LocalData\python
- Update your PYTHONPATH environment variable to include the site-packages subdirectory contained in the above: For example:
PYTHONPATH=c:\Users\caknigh\LocalData\python\pyodbc\Lib\site-packages
- Change directory to the unzipped contents (see step 3) and Install the Python package using the setup.py script. Use the prefix command to place the installed files in the selected installation directory. Continuing our example:
python setup.py install –prefix=c:\Users\caknigh\LocalData\python\pyodbc
You are now ready to use your newly installed python package. Note that no special permissions were required and your installation is independent of the main Anaconda installation.
SLURM: Scheduling Jobs so they Run Sequentially
Using the sbatch argument –dependency=singleton you can schedule a job so that it will begin execution only after any previously launched jobs sharing the same job name and user id have terminated. Using this technique you can submit all your jobs at once and not have to worry about them choking out other jobs. Here is an example of scheduling 5 jobs so that they will run one at a time:
sbatch --dependency=singleton --job-name=GroupA myJobScript1.sh
sbatch --dependency=singleton --job-name=GroupA myJobScript2.sh
sbatch --dependency=singleton --job-name=GroupA myJobScript3.sh
sbatch --dependency=singleton --job-name=GroupA myJobScript4.sh
sbatch --dependency=singleton --job-name=GroupA myJobScript5.sh
You can run multiple stacks like this so that you can control the number of jobs running at any given time. For example, to run two jobs at a time (one from GroupA and one from GroupB) use these commands:
sbatch --dependency=singleton --job-name=GroupA myJobScript1.sh
sbatch --dependency=singleton --job-name=GroupA myJobScript2.sh
sbatch --dependency=singleton --job-name=GroupA myJobScript3.sh
sbatch --dependency=singleton --job-name=GroupA myJobScript4.sh
sbatch --dependency=singleton --job-name=GroupA myJobScript5.sh
sbatch --dependency=singleton --job-name=GroupB myJobScript6.sh
sbatch --dependency=singleton --job-name=GroupB myJobScript7.sh
sbatch --dependency=singleton --job-name=GroupB myJobScript8.sh
sbatch --dependency=singleton --job-name=GroupB myJobScript9.sh
sbatch --dependency=singleton --job-name=GroupB myJobScript10.sh
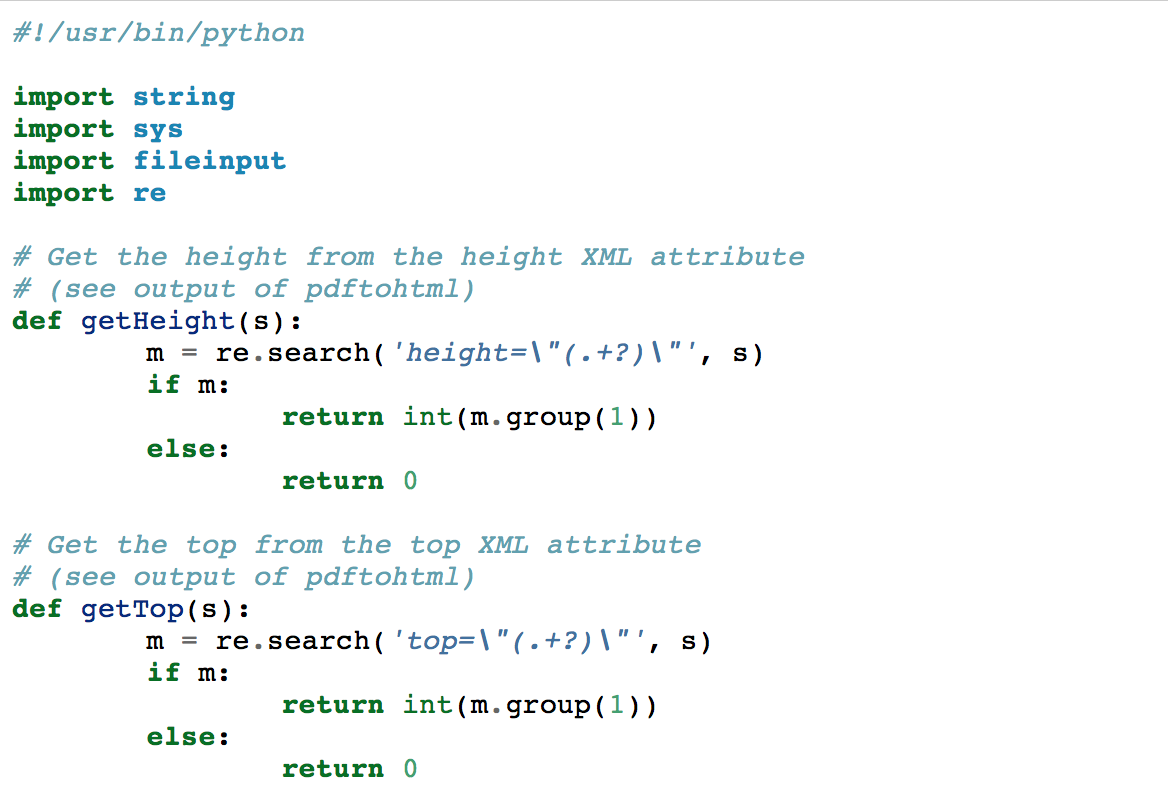
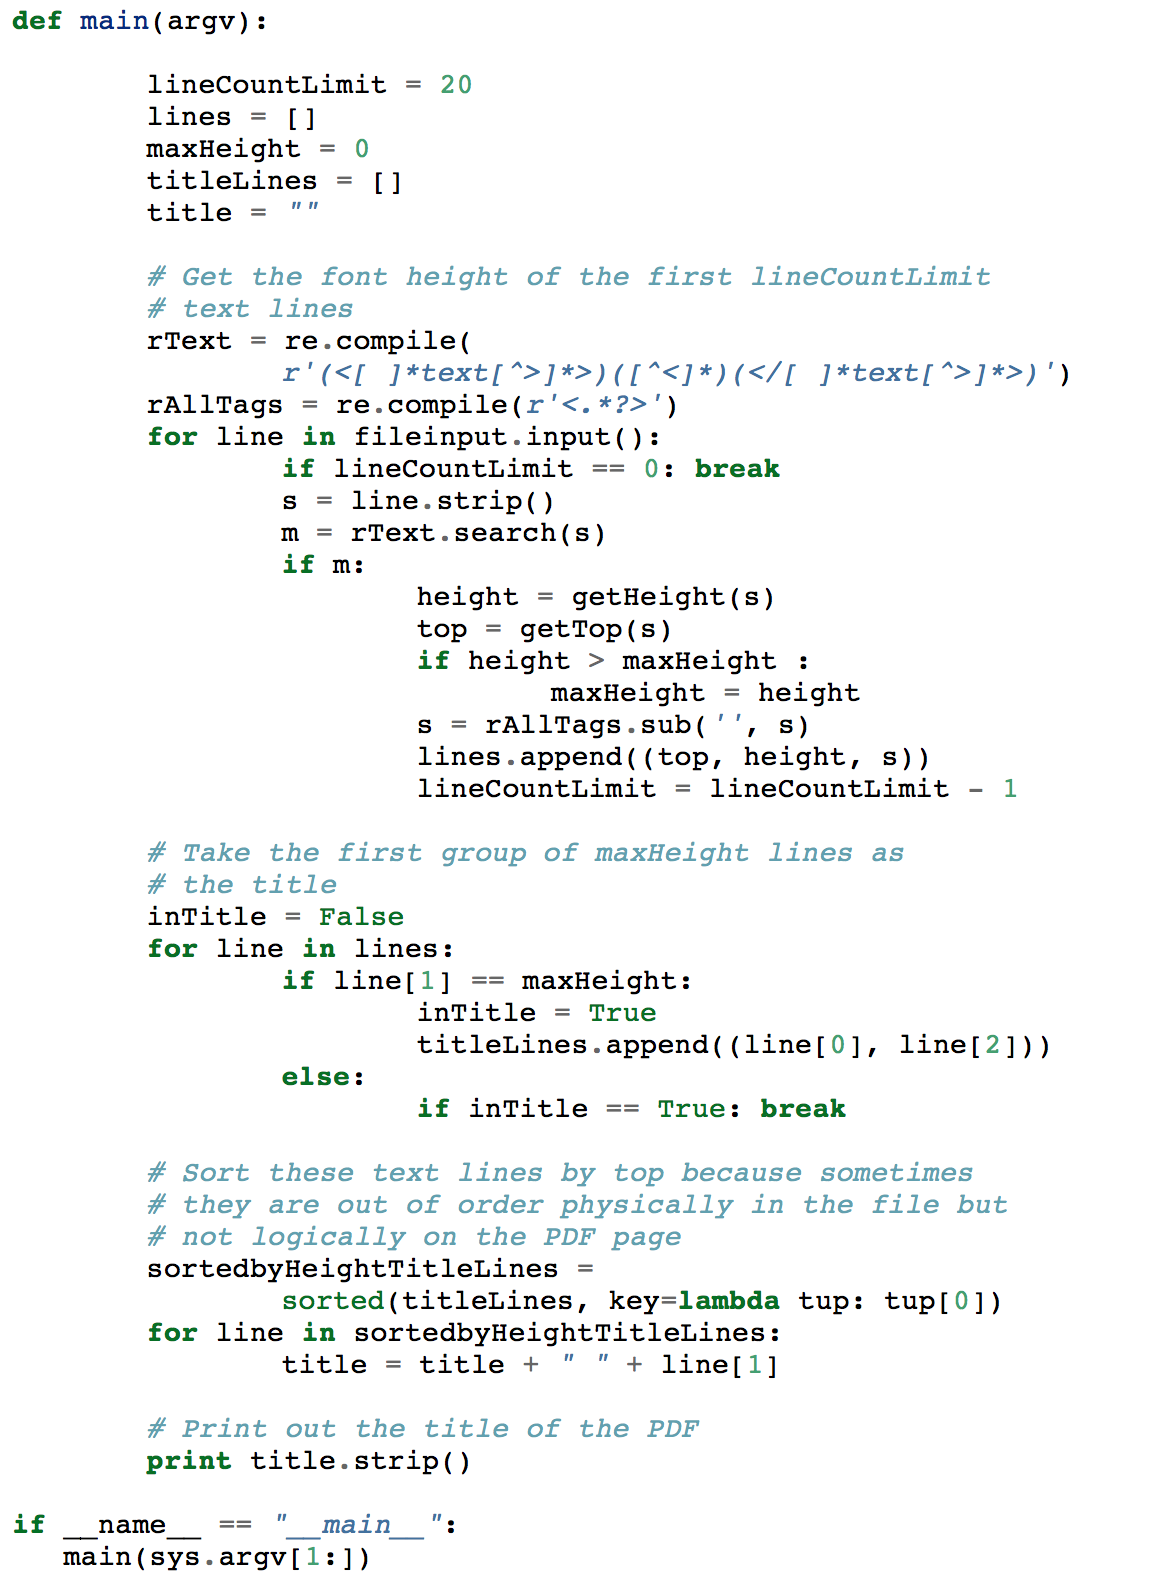
Mining PDF Metadata
Lately I’ve been doing a lot of work around Data Analytics and the mining of unstructured data from the internet. During a recent discussion with a colleague, I was told that it was impossible to extract the title of a paper from a PDF with any reliability. Well, it’s always fun doing the impossible, so here is a python program that allows the title of a paper to be extracted from a PDF.
Using SLURM to Determine Cluster Utilization
Using the sreport command you can create a cluster utilization report. Just specify the time slice using the Start and End options. To output the results as a percentage use the –t option. Finally the –parsable2 option makes the data parsable by excel. Here is an example of the command:
[caknigh@clusterhead1 slurm]$ sreport –parsable2 cluster utilization Start=09/01/14-00:00:00 End=09/31/14-23:59:59 -t percent
The resulting report will look like this:
——————————————————————————–
Cluster Utilization 2014-09-01T00:00:00 – 2014-10-01T23:59:59 (9999999*cpus secs)
Time reported in Percentage of Total
——————————————————————————–
Cluster|Allocated|Down|PLND Down|Idle|Reserved|Reported
descartes|57.97%|5.08%|0.00%|28.48%|8.46%|100.00%
Testing Using the Boost Unit Test Framework
I’ve been using Google’s unit test framework (gtest) for a few years now and while it has been very useful, I have to admit that it’s been a pain trying to make the libraries available to each and every project. I’ve thought about adding gtest to our standard build tools area but didn’t look forward to having to manage yet another tool.
While looking at Boost for my last post, I was pleasantly surprised to find that Boost also has a unit test framework. The Boost unit test framework (boost_unit_test_framework) is functionally equivalent to Google’s. Coupled with the fact that we already use Boost, it presents an opportunity to reduce the number of dependencies our projects have on external libraries.
The discussion that follows provides some simple guidance on how to start using the Boost unit test framework to test your software.
Using the Boost Unit Test Framework
Basic Structure
Similar to Google test, each compilation unit in your group of tests is meant to test a specific set of functionally. This basic unit is the test module. Each test module is composed of one or more test suites which may contain several test cases. Here is a basic skeleton of a test module:
#define BOOST_TEST_DYN_LINK
#define BOOST_TEST_MODULE ExampleTestModule
#include <boost/test/unit_test.hpp>
using namespace boost;
using namespace boost::unit_test;
BOOST_AUTO_TEST_SUITE(ExampleTestSuite)
struct TestFixture
{
TestFixture() : i( 0 ) { }
~TestFixture() { }
int i;
};
BOOST_FIXTURE_TEST_CASE(BoostWarnTest, TestFixture)
{
// Test predicates (see below)
}
// More test cases
BOOST_AUTO_TEST_SUITE_END()
// More test suites
The Boost unit test framework provides its own main entry point (main). In order to do this, Boost must know if you are using a dynamic or static version of the Boost libraries. If you are using a dynamic library version of the Boost, you must define the BOOST_TEST_DYN_LINK macro. If you are using a static library version, remove this definition since it will cause multiple definitions of the main entry point during linking.
The test module name is defined using the BOOST_TEST_MODULE macro and must precede the inclusion of the Boost unit test headers. This macro will taylor the Boost unit test definitions to your test module and generate the appropriate code.
Include the Boost unit test header (unit_test.hpp) and define the relevant namespaces (boost and boost::unit_test) to make using the unit test framework easier to use.
The Boost unit test suite name is defined by the macro BOOST_AUTO_TEST_SUITE. This macro identifies the test cases between it and the BOOST_AUTO_TEST_SUITE_END macro as being associated with the the test suite. Be aware that these macros generate code that defines a scope and must be paired to compile correctly.
The test fixture (named TestFixture above) defines an object which is used to initialize and later cleanup any external testing requirements. At the beginning of each test case a test fixture is created within the test case scope. This creation invokes the object’s constructor giving you an opportunity to acquire any resources your test case needs. At the end of each test case the test fixture will go out of scope allowing the destructor to clean up any resources you have acquired. Note that any public methods or instance variables within the test fixture will be accessible within your test case.
Finally, each test case is defined using the macro BOOST_FIXTURE_TEST_CASE. This macro takes two arguments. The first argument defines the test case name and should be unique. The second argument identifies the type name of the test fixture to be used during test case initialization.
As a final point, I have to point out that the Boost unit test framework can be very sensitive to name collisions. Make sure that each module, suite and test case use a unique name.
Test Predicates
Test cases may contain any number of test predicates. Here is an example of a valid test case:
BOOST_FIXTURE_TEST_CASE(MyTest, TestFixture)

{

     // Verify i is not 0

     BOOST_REQUIRE_NO_THROW(i = 4/i);

     // Verify i is equal to 3

     BOOST_CHECK(i == 3);

}
Test predicates are used within a test case to determine if the test requirements have been met. These predicates function like asserts and depending on their name modifiers issue warnings, test failures or fatal errors. Here is a list of the basic test predicates and an explanation of each:
BOOST_WARN(boolean expression)
This predicate evaluates the boolean statement provided and issues a warning if the statement is false.
BOOST_CHECK(boolean expression)
This predicate evaluates the boolean statement provided and issues a test failure if the statement is false.
BOOST_REQUIRE(boolean expression)
This predicate evaluates the boolean statement provided and issues a test error if the statement is false.
BOOST_WARN_MESSAGE(boolean expression, message)
This predicate evaluates the boolean statement provided and issues a warning with the specified message if the statement is false.
BOOST_CHECK_MESSAGE(boolean expression, message)
This predicate evaluates the boolean statement provided and issues a test failure with the specified message if the statement is false.
BOOST_REQUIRE_MESSAGE(boolean expression, message)
This predicate evaluates the boolean statement provided and issues a test error with the specified message if the statement is false.
BOOST_WARN_THROW(statement, exception)
This predicate evaluates the statement and issues a warning if the statement does not throw the expected exception (specified in the second parameter).
BOOST_CHECK_THROW(statement, exception)
This predicate evaluates the statement and issues a test failure if the statement does not throw the expected exception (specified in the second parameter).
BOOST_REQUIRE_THROW(statement, exception)
This predicate evaluates the statement and issues a test error if the statement does not throw the expected exception (specified in the second parameter).
BOOST_WARN_NO_THROW(statement)
This predicate evaluates the statement and issues a warning if the statement throws an exception.
BOOST_CHECK_NO_THROW(statement)
This predicate evaluates the statement and issues a test failure if the statement throws an exception.
BOOST_REQUIRE_NO_THROW(statement)
This predicate evaluates the statement and issues a test error if the statement throws an exception.
Running A Test Module
Running a test module is straight forward, just run the linked executable. Like Google test, you can control which tests are run and what level of detail the test framework will emit. Here are some simple examples:
example.test –help
This command runs the test executable and displays a command line argument help message.
example.test –log_level=warning
This command runs the test executable and requests that it emit only warning (and error) messages. Valid values for the log_level argument are: all, success, test_suite, message, warning, error, cpp_exception, system_error, fatal_error and nothing.
example.test –run_test=ExampleTestSuite/BoostWarnTest
This command runs the BoostWarnTest test case within the ExampleTestSuite test suite. Note that wildcards are acceptable within the test specification.
Putting it all together
Here is a full listing of the makefile used to create the test module:
# Define comple related values
CXX = clang++
CXXFLAGS = -O2 -g -Wall -std=c++11 -fmessage-length=0
INCLUDES := -I ~/Documents/Addons/boost
# Define linker related values
LD := clang++
LIBS := -L ~/Documents/Addons/boost/lib -lboost_unit_test_framework
# Create lists of the elements of our build
SOURCES := $(shell find . -depth 1 -name ‘*.cpp’ -print | sort)
OBJECTS := $(SOURCES:.cpp=.o)
TARGETS := $(SOURCES:.cpp=.test)
%.o:%.cpp
$(CXX) $(CXXFLAGS) $(INCLUDES) -c $< -o $@
# Define the default stanza
all: $(TARGETS)
# Deine a default stanza for linking all test executables
%.test : %.o
$(LD) $(LIBS) $< -o $@
chmod 755 $@
# Run all tests
run_tests: $(TARGETS)
@for target in $(TARGETS) ; do \
echo Running $$target ; \
$$target ; \
echo ; \
done
# Clean up deleting all temporary files
clean:
rm -f $(TARGETS) $(OBJECTS)
Here is a full listing of a working test module:
// The following two defines are required by the Boost unit test framework
// to create the necessary testing support. These defines must be placed
// before the inclusion of the boost headers.
//
// The first of these defines is used to indicate that we are building a
// unit test module that will link dynamically with Boost. If you are using
// a static library version of Boost, this define must be deleted. (or
// in this case commented out)
//
// The second define provides a name for our Boost test module.
#define BOOST_TEST_DYN_LINK
#define BOOST_TEST_MODULE ExampleTestModule
#include <boost/test/unit_test.hpp>
#include
#include
// The two relevant Boost namespaces for the unit test framework are:
using namespace boost;
using namespace boost::unit_test;
// Provide a name for our suite of tests. This statement is used to bracket
// our test cases.
BOOST_AUTO_TEST_SUITE(ExampleTestSuite)
// The structure below allows us to pass a test initialization object to
// each test case. Note the use of struct to default all methods and member
// variables to public access.
struct TestFixture
{
TestFixture()
: i( 0 )
{
// Put test initialization here, the constructor will be called
// prior to the execution of each test case.
printf(“Initialize test\n”);
}
~TestFixture()
{
// Put test cleanup here, the destructor will automatically be
// invoked at the end of each test case.
printf(“Cleanup test\n”);
}
// Public test fixture variables are automatically available to all test
// cases. Don’t forget to initialize these variables in the constructors
// to avoid initialized variable errors.
int i;
};
// Define a test case. The first argument specifies the name of the test.
// Take some care in naming your tests. Do not reuse names or accidentally use
// the same name for a test as specified for the module test suite name.
//
// The second argument provides a test build-up/tear-down object that is
// responsible for creating and destroying any resources needed by the
// unit test
BOOST_FIXTURE_TEST_CASE(BoostWarnTest, TestFixture)
{
// Provide a test predicate (i.e. a conditional statement) that evaluates
// to true to allow the test to pass and will not issue a warning.
BOOST_WARN(true);
// Provide a test predicate (i.e. a conditional statement) that evaluates
// to false to force the test to fail and will issue a warning.
BOOST_WARN(false);
}
BOOST_FIXTURE_TEST_CASE(BoostCheckTest, TestFixture)
{
// Provide a test predicate (i.e. a conditional statement) that evaluates
// to true to allow the test to pass and will not indicate a failed test.
BOOST_CHECK(true);
// Provide a test predicate (i.e. a conditional statement) that evaluates
// to false to force the test to fail and will indicate a test failure.
BOOST_CHECK(false);
}
BOOST_FIXTURE_TEST_CASE(BoostRequireTest, TestFixture)
{
// Provide a test predicate (i.e. a conditional statement) that evaluates
// to true to allow the test to pass and will not indicate a fatal test error.
BOOST_REQUIRE(true);
// Provide a test predicate (i.e. a conditional statement) that evaluates
// to false to force the test to fail and will indicate a fatal test error.
BOOST_REQUIRE(false);
}
BOOST_FIXTURE_TEST_CASE(BoostWarnMessageTest, TestFixture)
{
// Provide a test predicate (i.e. a conditional statement) that evaluates
// to true to allow the test to pass and will not issue a warning with
// message.
BOOST_WARN_MESSAGE(true, “This should pass”);
// Provide a test predicate (i.e. a conditional statement) that evaluates
// to false to force the test to fail and will issue a warning with message.
BOOST_WARN_MESSAGE(false, “This should fail”);
}
BOOST_FIXTURE_TEST_CASE(BoostCheckMessageTest, TestFixture)
{
// Provide a test predicate (i.e. a conditional statement) that evaluates
// to true to allow the test to pass and not will indicate a failed test
// with message.
BOOST_CHECK_MESSAGE(true, “This should pass”);
// Provide a test predicate (i.e. a conditional statement) that evaluates
// to false to force the test to fail and will indicate a test failure
// with message.
BOOST_CHECK_MESSAGE(false, “This should fail”);
}
BOOST_FIXTURE_TEST_CASE(BoostRequireMessageTest, TestFixture)
{
// Provide a test predicate (i.e. a conditional statement) that evaluates
// to true to allow the test to pass and will not indicate a fatal test
// error with message.
BOOST_REQUIRE_MESSAGE(true, “This should pass”);
// Provide a test predicate (i.e. a conditional statement) that evaluates
// to false to force the test to fail and will indicate a fatal test error
// with message.
BOOST_REQUIRE_MESSAGE(false, “This should fail”);
}
BOOST_FIXTURE_TEST_CASE(BoostWarnThrowTest, TestFixture)
{
// Provide a statement that is expected to throw with a specific exception.
// Provide the expected exception as the second argument. Since the
// exception types match, the test will pass and will not issue a warning.
BOOST_WARN_THROW(
throw std::range_error(“This should pass”),
std::range_error);
// Provide a statement that is expected to throw with a specific exception.
// Provide the expected exception as the second argument. Since the
// exception types do not match, the test will not pass and will issue a
// warning.
BOOST_WARN_THROW(
throw std::range_error(“This should fail”),
std::underflow_error);
}
BOOST_FIXTURE_TEST_CASE(BoostCheckThrowTest, TestFixture)
{
// Provide a statement that is expected to throw with a specific
// exception. Provide the expected exception as the second argument.
// Since the exception types match, the test will pass and will
// not issue a test failure.
BOOST_CHECK_THROW(
throw std::range_error(“This should pass”),
std::range_error);
// Provide a statement that is expected to throw with a specific
// exception. Provide the expected exception as the second argument.
// Since the exception types do not match, the test will not pass and
// will issue a test failure.
BOOST_CHECK_THROW(
throw std::range_error(“This should fail”),
std::underflow_error);
}
BOOST_FIXTURE_TEST_CASE(BoostRequireThrowTest, TestFixture)
{
// Provide a statement that is expected to throw with a specific
// exception. Provide the expected exception as the second argument.
// Since the exception types match, the test will pass and will not
// issue a fatal test error.
BOOST_REQUIRE_THROW(
throw std::range_error(“This should pass”),
std::range_error);
// Provide a statement that is expected to throw with a specific
// exception. Provide the expected exception as the second argument.
// Since the exception types do not match, the test will not pass
// and will issue a fatal test error.
BOOST_REQUIRE_THROW(
throw std::range_error(“This should fail”),
std::underflow_error);
}
BOOST_FIXTURE_TEST_CASE(BoostWarnNoThrowTest, TestFixture)
{
// Provide a statement that is not expected to throw. If the statement
// does not throw, the test will pass and not issue a warning.
BOOST_WARN_NO_THROW(i = 1);
// Provide a statement that is expected to not throw. If the statement
// does throw, the test will fail and issue a warning.
BOOST_WARN_NO_THROW(
throw std::range_error(“This should fail”));
}
BOOST_FIXTURE_TEST_CASE(BoostCheckNoThrowTest, TestFixture)
{
// Provide a statement that is not expected to throw. If the statement
// does not throw, the test will pass and not issue a test failure.
BOOST_CHECK_NO_THROW(i = 2);
// Provide a statement that is expected to not throw. If the statement
// does throw, the test will fail and issue a test failure.
BOOST_CHECK_NO_THROW(
throw std::range_error(“This should fail”));
}
BOOST_FIXTURE_TEST_CASE(BoostRequireNoThrowTest, TestFixture)
{
// Provide a statement that is not expected to throw. If the statement
// does not throw, the test will pass and not issue a test failure.
BOOST_REQUIRE_NO_THROW(i = 3);
// Provide a statement that is expected to not throw. If the statement
// does throw, the test will fail and issue a test failure.
BOOST_REQUIRE_NO_THROW(
throw std::range_error(“This should fail”));
}
// This must match the BOOST_AUTO_TEST_SUITE(ExampleTestSuite) statement
// above and is used to bracket our test cases.
BOOST_AUTO_TEST_SUITE_END()
For more information consult the Boost unit test framework user’s guide located at:
http://www.boost.org/doc/libs/1_46_1/libs/test/doc/html/utf/user-guide/
